
If you’re a beginner in sewing, you might be asking: “What are the essential sewing machine stitches would I need to get started on my first project?” There are two essential stitching and four more that are nice to have. Let’s figure out which of them and what they are best suited for.
Sewing Machine Stitches
Different types and versions of sewing machines might differ considerably in terms of features.
When you’re looking to buy your first machine, you’ll instinct want to get the one with the most stitches available. However, in reality, you won’t need or utilize many of them.
The following are the top six most-frequently used sewing machine stitches:
- Straight stitch
- Zig-zag stitch
- Overcast stitch
- Blind Hem stitch
- Decorative stitch
- Buttonhole stitch
The most of your sewing projects will only require two of stitches – the straight stitch and zig-zag stitch.
Straight and zig-zag stitches are suitable for sewing practically 99% all sewing projects. Any other stitching types on a sewing machine are simply an added bonus and not absolutely necessary since there are always alternatives.
If you don’t have a serger (also known as an overlocker), the overcast stitch may be used to finish raw edges and make your belongings long-lasting and sturdy.
Many modern devices come with a dazzling collection of decorative stitches, that you’ll most likely never use.
How to Switch Stitches
The mechanical sewing machine will have a pattern selector dial on the side or front of the machine to choose from a variety of stitching options.
The control panel on a computerized sewing machine will generally be located in the front where you can choose your desired stitch.
Types of Sewing Machine Stitches
Here we’ll go over the six sorts of stitching that are machine-made and must be understood by any novice.
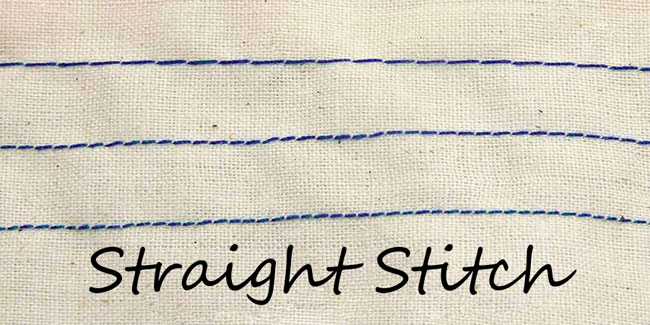
#1 – Straight Stitches
The straight stitch is without a doubt the most-used stitch on each sewing machine, so it’s no surprise that it’s at the top of every list.
Lengths of straight stitches on less expensive machines are predetermined, while stitch lengths on more costly ones may be adjusted.
Even if your machine only performs straight stitching, it’s ready to handle most sewing tasks. You may even use a straight stitch to finish raw edges!
As a basic guideline:
- Length 2.0-3.0 is the most popular choice for sewing seams and much of your sewing.
- Length 4.0 is used for meeting fabric and machine baste fabric. Ruffles, of course, require gathering. Long basting stitches are used in areas where you wish to keep parts joined together temporarily before the final stitching. A long length is necessary so that it may be readily removed if required.
It’s also critical to remember that your needle position should be set to the middle of the presser foot when stitching a straight stitch.
On some sewing machines, a triple straight stitch is also available. The machines have advanced two steps ahead and one step back. This is a stitch that’s extra durable, making it ideal for stress points in pants’ seams. I also think it looks nice when used to topstitch because it creates a thicker line.
#2 – Zig-zag Stitch
Zig-zag stitches are frequently employed to prevent raw edges from fraying and sewing knits without a serger, since they have built-in stretch. A small zig-zag can also be used to sew seams of tulle or applique bright patterns on your projects and for decoration.
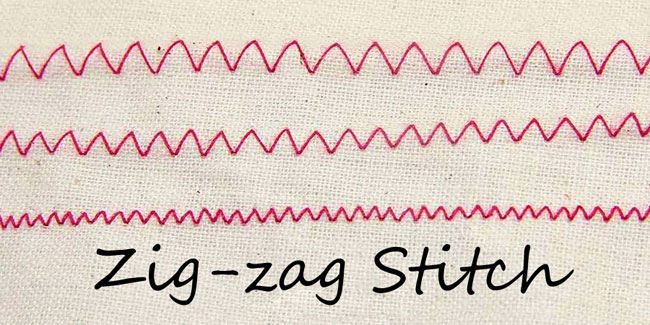
The correct width and length of a zig-zag stitch may need some experimenting, but here are some starting points:
- Sewing knits on seams – When sewing knits, you should be able to barely see the zig-zag. Choose a length of 2.5 and a width of 1.0 for your test. Pull the seam with a scrap to test it out. If the stitches don’t give way with a little amount of pressure, you’re ready to go!
- Sewing knit hems – Hems on knits might be made with a zig-zag stitch. Turn up the bottom and zig-zag around the raw edge. The zig-zag should be at least four times as large as the seams. Test a length of 3.0 and a width of 4.0
- Finishing raw edges – It can prevent fraying and extend the life of your items if you use zig-zag as a seam finish on raw edges. On the fabric’s edge, use a length of 3.0 and width of 4.0
- Applique – The zig-zag stitch used on Applique is very tight, allowing only a little bit of cloth to show between the stitches. The most popular width 4.0 and length 0.5
- Gathering with zig-zag – By zig-zagging over a slick cord such as dental floss or crotchet yarn, you may then draw the cord to form gathers in challenging materials like as tulle and canvas.
- Sewing elastic – Zig-zag may be used to sew elastic in leotards and also fold over elastic in underwear.
#3 – Over-edge Stitch
Over-edge or Overlock sewing machine stitches, which can be used to prevent fraying like a serger, are found on most modern machines.
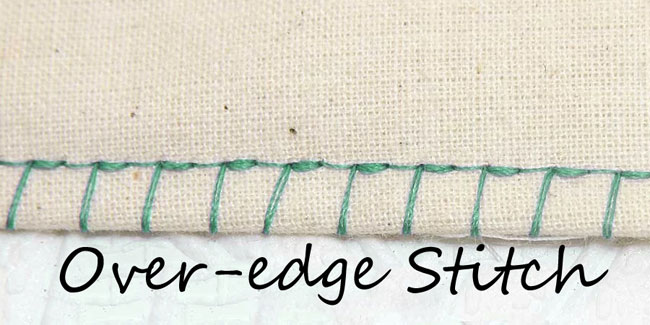
The primary distinction between using a serger and butting your regular machine to execute an overlock stitch is that the raw edges are not trimmed as you sew.
Many machines will come with a specific sewing machine foot to complete this stitch.
The secret to having clean edges is to cut the fabric as soon as possible before stitching. Even if you overlock a ragged edge, it won’t look attractive.
Personally, I often use regular zig-zag instead of an overlock stitch, at least I think it’s faster than changing feet. However, you will give it a try and figure out which one way is best for you.
If you want to sew often or need to make money by sewing, a serger (sometimes called an overlocker in other countries) is required.
#4 – Blind Hem Stitch
A blind stitch seam is one that does not show when the garment is worn. On dresses, skirts, and pants, blind stitch hems are used to produce undetectable finishes.
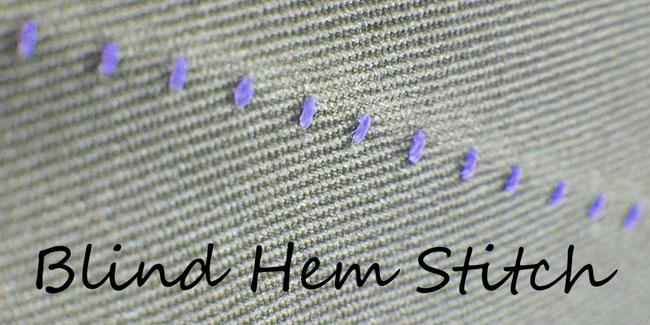
The construction of this stitch appears like an uneven zig-zag and, mostly, even basic machines can execute it. The stitches are so tiny that you won’t be able to notice them on the right side of the garment after they’re finished.
Ideal for wider straight-edged hemlines, these stitches are ideal for flatter garments.
#5 – Decorative Stitches
Various types of decorative stitching exist on different machines, so look to see which yours has. It might only have a few or even none of them. Don’t be concerned, the majority of people don’t use these stitches very often, and I can’t think of the last time I did.
These few stitches may be used for a beautiful effect on your projects.
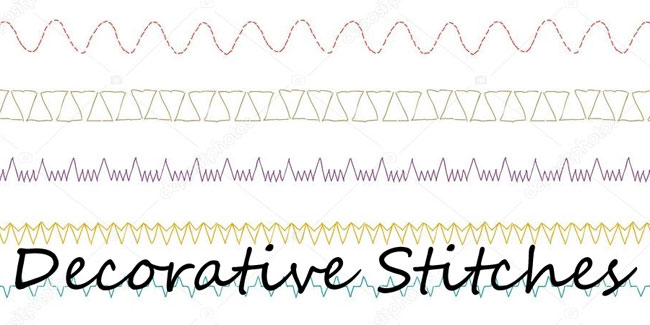
Use a bright color and different threads to create a pop of color on the same project. They’re best utilized on smaller objects such as home décor and baby clothing since the intricacies of the stitches can’t be seen from afar.
Here are some examples of beautiful decorative stitching. So grab a scrap of fabric and put to the test on your machine some of the decorative stitches.
#6 – Buttonhole Stitches
A buttonhole stitch is included on even the most basic of sewing machines these days. You may even have a variety of buttonhole types to pick from if you have a more pricey model.
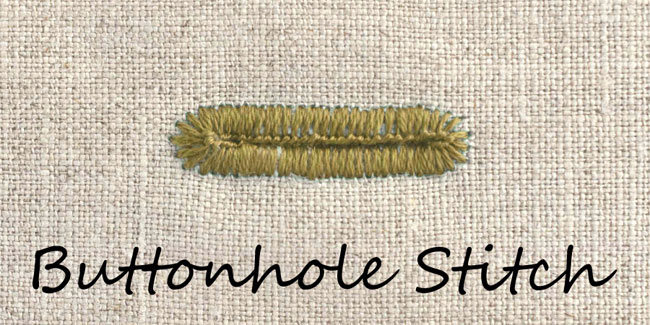
Buttonholes can be stitched automatically, which means they sew all sides of the buttonhole at once, or they may have multiple stages where you must change the stitch setting.
If you’re using a machine with no specialty buttonhole stitch, you may use a zig-zag to sew buttonholes.
In Conclusion
This is a list of the top six most frequently used sewing machine stitches. But remember, you can perform every sewing task you want even if all your machine does is straight stitch and zig-zag.